-
E-mail
6747683974@qq.com
-
Phone
13355112882
-
Address
No. 6, Jidong Mining Outer Road, Rencheng Development Zone, Jining City
Product Categories
- UV radiometer
- Wet sponge pinhole leak detector series
- Wet sponge pinhole leak detector
- Intelligent coating thickness gauge
- High temperature electromagnetic ultrasonic thickness gauge
- roughness meter
- Magnetic Particle Inspection Machine
- Portable black and white transmission densitometer
- Adhesion Tester
- Pipeline detector
- Pipeline anti-corrosion layer detection leak detector
Shandong Ruizhi Kedian Testing Instrument Co., Ltd
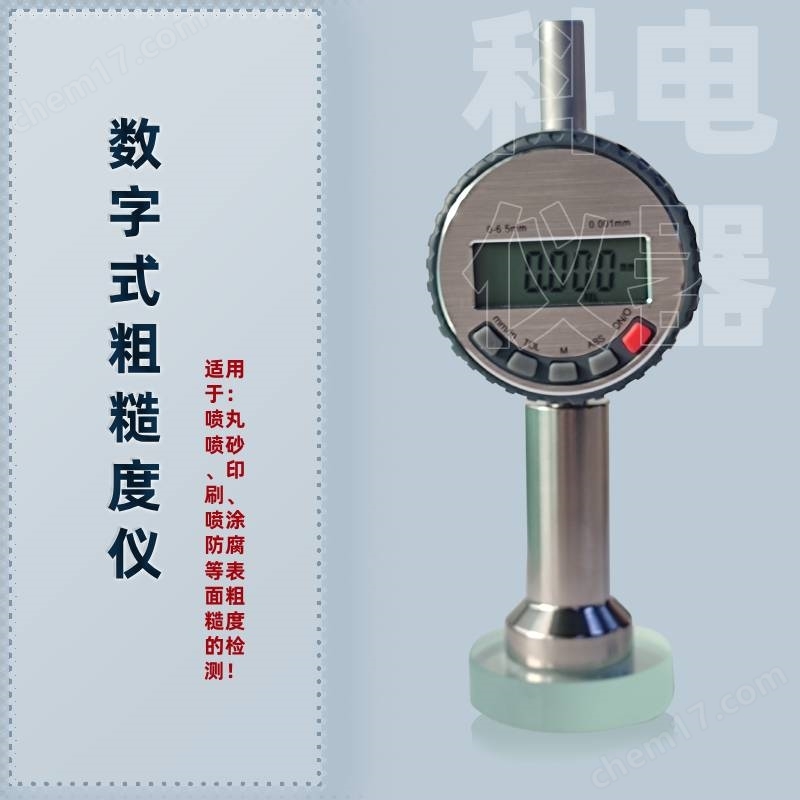


LCD digital display sandblasting and shot peening surface roughness testing with anchor pattern instrument
NegotiableUpdate on 01/18
- Model
- Nature of the Manufacturer
- Producers
- Product Category
- Place of Origin
Overview
The LCD digital sandblasting and shot peening surface roughness test uses an anchor pattern meter $r $n digital surface roughness meter, which can directly measure the height of the peak valley of the workpiece surface. It is suitable for industries that require surface roughness such as shot peening, printing, and spray anti-corrosion! Measure surface contours and pits; Only a small measurement area is needed.
Product Details
one.Technical Specifications:
range |
0--6.5mm |
resolution |
0.001mm |
error |
±0.003mm |
Working power supply: |
SR44, Voltage 1.5V |
working environment |
0~40℃/≤80%rh |
Storage and transportation temperature: |
-10~60℃ |
two.Function:
1. Switch/Reset button: Press the switch/reset button (ON/0) to turn on the power. Short press this button to reset to zero to enter measurement mode. Press and hold the key to shut down.
2. Metric to English conversion key (mm/in) key: can convert between millimeters and inches
3. Use of function keys (M)
A: HOLD: Short press this key to keep the measured data unchanged, press it again to switch to normal settings
B: Quick value tracking: Press and hold this button until "MAX" is displayed. During testing, the displayed value is the zuida value during the measurement process. Press this button again to reset to the current measurement value and start a new measurement. After using this function, long press this button to display MIN, long press again to display △, and then long press this button again. The top line of the display screen will disappear, indicating that it has entered the normal measurement state
LCD digital display sandblasting and shot peening surface roughness testing with anchor pattern instrument
C: Quickly follow the minimum value: Press and hold this key until "MIN" is displayed. During testing, the displayed value is the minimum value during the measurement process. After using this function, long press this key to display △, and then long press this key again. The top row of the display screen will disappear, indicating that it has entered the normal measurement state
D: Quick follow-up difference (△): In test mode, press and hold the M key repeatedly until "△" is displayed, and the displayed value will automatically reset to zero. When measuring, the displayed value △=MAX-MIN. After using this function, long press this button, and the top line of the display screen will disappear, indicating that it has entered the normal measurement state
4.Tolerance setting key(TOL: Move the roughness meter to the limit value of the measured workpiece (high or low), long press the tolerance setting button, and the TOL SET will be displayed at the bottom left of the screen, indicating that this limit value has been set; Move the roughness gauge to the (high or low) limit value again, long press the tolerance setting button, and TOL will be displayed in the lower left corner of the screen. This limit value setting is complete. The system automatically enters the tolerance judgment state. During the measurement process, if the measured value is before the high and low limit values, the screen displays GO. If the measured value exceeds the high and low limit values, the screen displays NO GO and flashes. To exit the tolerance judgment state, press the setting button briefly. If you want to return to the tolerance measurement state set last time, press the tolerance setting button briefly.
5th JudgeMeasurement key(ABS: The default state of the instrument is the relative measurement state, and REL is displayed in the lower right corner of the screen. Long press the button to display SET at the bottom of the screen, and the screen number will flash. Short press the switch/reset button, and this number can be changed from 0-9 in sequence. After selecting the appropriate number, short press the button to enter the next digit setting. The maximum value is 99.99. After setting is complete, long press the button, and ABS will be displayed at the bottom of the screen. The number will no longer flash, and the measurement mode will be entered. If you want to cancel the juedui measurement status, press the switch/reset button briefly.
three.Measurement method:
1. Press the power button to turn on the device
2. Select the measurement unit mm/inch,
3. Press the instrument touch pin steadily onto the calibration glass plate, press the calibration button, and calibrate multiple times until the screen displays "0" as the standard
4. Place the instrument on the metal surface after sandblasting and press it steadily. Do not pull horizontally on the measuring surface.
5. Read and record the distance between the peak and valley of the sandblasted surface, that is, the surface roughness.
6. According to the standard requirements, measure 10 times on the sandblasted surface and record the average value of the 10 measurements.
4 Notes:
This instrument belongs to precision instruments and should be prevented from impact and falling to avoid affecting accuracy
2 should avoid the infiltration of water, oil, dust, etc
3 can be wiped with cleaning, do not use organic solvents such as acetone
After use, please turn off the power to extend the battery life. If not used for a long time, the battery should be removed.
LCD digital display sandblasting and shot peening surface roughness testing with anchor pattern instrument
fiveCommon faults:
Fault phenomenon |
original because |
troubleshooting |
Digital flashing display |
Low battery voltage |
Replace the battery |
do not display |
1. Low battery voltage |
1. Replace the battery with a new one |
2. Poor battery contact |
2. Scratch the battery contacts |
|
The digital lock on the display screen remains unchanged |
Software running error |
Remove the battery1 minute reload |
sixAccessories List
1. Host 2. Instrument box 3. Calibration block 4. Instruction manual 5. Certificate of conformity 6. Verification certificate
Optional data cable for data upload
Similar Product Recommend


